Logo Detection with OpenCV
For a few years, I’ve wanted to play with OpenCV for logo detection, but never got around to it. However, now that I’ve started using Copilot, it’s lowered the activation energy for new projects, and I was pleasantly surprised by the results. The code for this project is available here.
Query Image Selection
The first step involves selecting a “query” image to use. Since a lot of products claim to be gluten-free, but don’t impose any testing to verify their claim, the certified gluten free logo is a practical choice since it is distinctive and indicates that a product is actually tested. The following image is a “cleaned up” version that can be matched to the logos that appear on products.

Detection Techniques
For simplicity, the knnMatch method works pretty well as long as the image quality is reasonable and the threshold is appropriately calibrated (see the “Threshold Calibration” section below for details). Another tip is to convert all images to grayscale and attempt to match the query image both against the grayscale and the inverted grayscale of the target image.
Data Collection
As usual, this was the annoying part. I searched the internet for images of products with the new certified gluten-free logo and put them into a “yes” folder. I also created a “no” folder where I put images of products that did not have the logo.
Threshold Calibration
To test all thresholds in increments of .05 from 0.05 to 0.95, the following line can be used:
thresholds = np.arange(0.05, 1, 0.05)
Using the data collected from the previous section and the techniques described previously, the various thresholds can be looped over to indentify the ideal tradeoff between false positives and false negatives. Here are the results from the sample project.
| Threshold | FalseNegative | TruePositive | TrueNegative | FalsePositive |
|---|---|---|---|---|
| . | . | . | . | . |
| . | . | . | . | . |
| . | . | . | . | . |
| 0.20 | 0.45 | 0.55 | 1.00 | 0.00 |
| 0.25 | 0.18 | 0.82 | 0.99 | 0.01 |
| 0.30 | 0.09 | 0.91 | 0.98 | 0.02 |
| 0.35 | 0.09 | 0.91 | 0.91 | 0.09 |
| 0.40 | 0.00 | 1.00 | 0.65 | 0.35 |
| 0.45 | 0.00 | 1.00 | 0.50 | 0.50 |
| . | . | . | . | . |
| . | . | . | . | . |
| . | . | . | . | . |
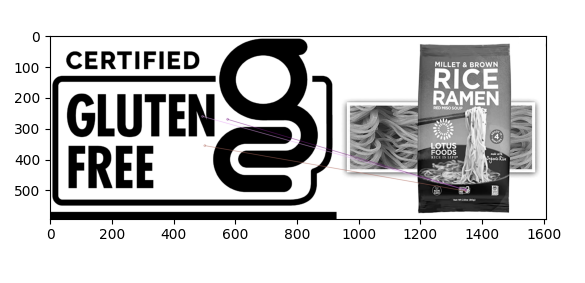
Visualization
To see what is going on “under the hood”, you can set the “debug” option within the “query_is_in_image” function from the sample project as shown below:
query_is_in_image('gf-query.png', image, threshold=.25, debug=True)
This option will display a visualization of where (if at all the query image was detected).

Conclusion
The OpenCV library is easy to use and works astonishingly well (granted that this is a relatively simple use case). The applications for this technology are far reaching, and, now that I have a working prototype project, I will be making use of this for other projects in the future.